
If you’re using the WordPress.org version of WordPress, you can use both free and premium plugins. These plugins will allow you get the most out of your WordPress blog and website. Those not able to find the “Plugins” section in WordPress are using the WordPress.com version, which doesn’t utilize plugins.
Using plugins is one of the most powerful ways to customize the look and function of your website. Plugins allow you to create better security, SEO, social media sharing and so much more. No matter what you want to accomplish, WordPress probably has a plugin for it. Here are a few of the easiest and most productive ways to install WordPress plugins.
How to Install a WordPress Plugin
There are a couple of ways to install WordPress plugins. You can use the download/upload method or the search method.
Download/Upload Method
If you found the plugin you want to use by searching on Google and downloading a .zip file, you will want to use this installation method.
- Step #1 – Log into your WordPress Dashboard
- Step #2 – Go to Plugins >> Add New
- Step #3 – Click “Upload”

- Step #4 – Click “Choose File”
- Step #5 – Find the File for the plugin and Click “Install Now”
- Step #6 – Activate your new Plugin
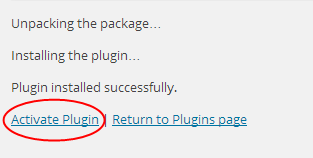
Once the plugin is activated, you can adjust the settings and use the plugin for your WordPress blog. This method works best for any premium plugin because you will most likely download a .zip folder before installing the plugin for your website.
The Search Method
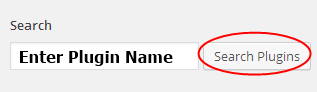
If you haven’t found the plugin you want to use yet, you can use the search method to find and install your new plugin.
- Step #1 – Log into your WordPress Dashboard
- Step #2 – Go to Plugins >> Add New
- Step #3 – Enter the name of the plugin in the search box and click “Search Plugins”
- Step #4 – Click the “Install Now” link under the right plugin

- Step #5 – Click “OK”

- Step #6 – Activate your new Plugin
These are the easiest two ways to install your new WordPress plugins. There is one more way you can install plugins, which helps quite a bit if you plan to use the same plugins on multiple websites.
How to Install and Copy Plugins in cPanel
This method will allow you to install your WordPress plugins by uploading them into the right file inside your file manager.
- Step #1 – Log into your cPanel
- Step #2 – Find and open the File Manager
- Step #3 – Open your “Root” Folder
- Step #4 – Open your “wp-content” folder
- Step #5 – Open your “plugins” folder
- Step #6 – Click “Upload”

- Step #7 – Upload the .zip folder for your plugin
- Step #8 – Unzip the folder
Now you have installed your WordPress plugin through cPanel. You can also copy the plugins from another WordPress blog on the same host to your new site. Just select the plugin folders you want to copy and fill in the information for your new WordPress website.

Once you’ve filled out the destination, click “Copy File(s)” and you will have all your plugins installed for your new website.
Another method, which is very similar to installing WordPress plugins in cPanel is to use an FTP manager. This method is recommended for those familiar with using FTP Software. It will work much like the above method for installing WordPress plugins within cPanel. However, you will have to connect your FTP manager to your server before you can access the right file folders.
Use these methods to install and activate any type of plugin you want in WordPress. Whether you plan to use the same plugins on each website or you want to use different choices, you can set them all up easily with these installation methods.
Beginners should stick to the download/upload method and the search method. These are the easiest two methods to install and activate any WordPress plugin you want to use for your WordPress blog, whether free or premium.
