
Most beginners and some veterans have no idea that they can install WordPress on their personal computer. Of course, this is only for testing and learning purposes, but it can be very helpful. The process isn’t very difficult, but you will need WAMP to make this happen.
What is WAMP?
WampServer or WAMP is a compilation of MySQL, Apache web server and PHP. It’s a bundled used for Windows computers and required to set up your own local server environment. If you want to install WordPress on your personal computer and you’re running Windows, you will need WAMP or XAMPP, but WAMP is the recommended choice.
How to Install WAMP on your PC
You will need to start by downloading the latest version of WAMP from the official website here: WAMP Website.
Make sure you choose the right version, which will either be the 64-bit or 32-bit version of WAMP. If you’re not sure which one is best for your system, choose the 32-bit because it will work with the 64-bit versions of Windows, as well.

Once you have completed the download process, you will be ready to install WAMP on your PC. Just follow the on-screen instructions for the installation. You will be given an option to create a quick launch icon and/or a desktop icon. Choosing both will give you full convenience to find WAMP whenever you want to use it.

Make sure you choose the default web browser you use most. The program will default to Internet Explorer, so if you use Firefox or Google Chrome, you will need to make this change.

After the installation is complete, you can launch WAMP.
How to Set Up a WordPress Database with WAMP
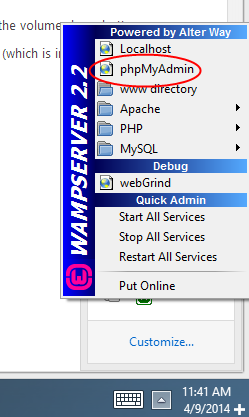
WAMP will give you phpMyAdmin with it, which makes it easy to manage the MySQL databases. You will need to launch the program by clicking on the WAMP icon in your Windows taskbar. Then, click the phpMyAdmin section.
This will open a new window in your browser and you will want to click on Databases.

From here, you can create a new database for WordPress and name it. Once you have selected a name, just click the “create” button.

Now, you are ready to install WordPress on your PC with WAMP.
Installing WordPress on a Windows Computer with WAMP
Installing WordPress on your Windows computer requires downloading it from WordPress.org. Once you have downloaded WordPress, you will need to extract the .zip folder and copy the WordPress folder. You will want to paste the folder in the C:wampwww folder. You can rename the folder anything you want, such as TestSite or MySite.
At this point, you will get a message telling you the wp-config.php file could not be found. It will have a button that says “Create a Configuration File” and you want to click this button.

The next screen will allow you to enter the database you created earlier. You will also want to leave the username as “root” and the password as blank. Once you’ve filled in this information, just click the “submit” button.
You should get a screen telling you that the configuration file has been created with a button for installing WordPress. Click the “Run the install” button and follow the on-screen instructions. Make sure you choose an admin username and password. If you have ever installed WordPress on a hosting account, this screen will look familiar to you.
Once you fill in the information, click the “Install WordPress” button and you will soon have WordPress installed on your Windows PC. After the program is done installing, you will get a success message and you can stat setting up WordPress.
Installing WordPress on your Windows PC with WAMP isn’t very difficult. This can help with development of themes and plugins. For beginners, installing WordPress on your PC can allow you to learn all the different things you can do with this powerful content management system without testing things on your actual website. This is far better than trying to test new things on your website and finding out you completely changed something accidentally.
