
 WordPress allows you to change the content you display on your homepage from your blogroll or recent blog posts to a static page. If you do this, you may want to create a separate page for your blog posts. Most websites will use this option and just call the new page “blog” or “news.”
How to Create a Static Page for Your Blog Posts in WordPress
Creating a static page for your blog posts isn’t difficult. WordPress comes complete with the necessary templates to make this happen. The platform supports a custom homepage and a custom blog page. For this example we will be working with the Twenty Fourteen Theme. This is one of the default themes that comes with all new installations of WordPress.
- Step #1 – Log into your WordPress Dashboard
- Step #2 – Go to Pages >> Add New
- Step #3 – Choose the Template you want to use for your Blog Page. (Some themes have a “Front Page Template” specifically for this task, for others the “Default Template” will work just fine.)

- Step #4 – Name your page either “Blog” or “New” in the Title section.

- Step #5 – Publish your Blog Page
- Step #6 – Go to Settings >> Reading
- Step #7 – Click the “A Static Page” option to allow for a “Front Page” and “Post Page” selection
- Step #8 – Select a “Front Page” and a “Post Page” from the drop down menus

After you’ve changed these options you will want to click “Save Changes” at the bottom of the page. You can also change the number of Blog posts shown on the Blog Page.

Most blogs leave this set at the default number of “10”, but some do change the number to “5” or even “20”. It’s really up to what you prefer for your specific project.
After setting up your Blog Page, you will have a link in your main menu for your homepage and one for your Blog Page. In the Twenty Fourteen WordPress theme, it will look like this:

Of course, if you’re using a different type of theme, it may look a bit different. Make sure to check the Blog Page for the most current posts on your website. As long as they are displayed, you have followed the instructions properly and created a static page for your blog posts.
Adjusting the Options for Your Blog Page and Homepage
After you’ve created your new Blog Page and a static homepage, you may want to change a few of the options on these pages. Maybe you don’t want to allow comments on either page, which makes perfect sense. This adjustment is made in the “Page Editor” screen of the specific page. Go to Pages >> All Pages and select the correct page. Click “edit” and you will be in the right place.
In the top right corner of the page, you will see “Screen Options,” which will allow you to make your specific adjustments. It looks like this:

Click this menu and you will get a screen that looks like this:
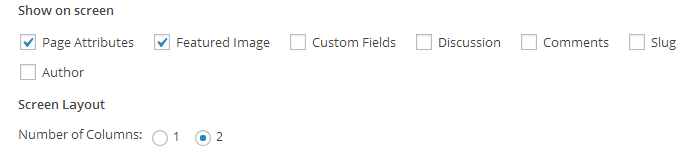
You may have more options than shown, depending on your theme and the plugins you’re using. Any option you check will display in the “edit page” screen below. The option we are looking for to turn off comments is called “discussion.”

Check this box and you will find a section below the content editor that looks like this:

Uncheck both of the check boxes to ensure comments are not allowed on your homepage or your Blog Page. This will keep all comments from showing up and will take away the option for visitors to even leave a comment.
It’s highly recommended that you don’t allow comments on your Blog Page. Most WordPress users turn this option off on all static pages, but allow it on all blog posts. Ultimately, it’s up to you to make this decision, but our recommendation is to turn comments off on all your static pages, including your Blog Page.
