
If you’re not familiar with what a favicon is, it’s the small icon that appears next to your website title in your browser. If you don’t have one, it may just look like a piece of paper with a bent corner. However, you can add a favicon to your WordPress blog and give it a little more of a professional look.
What does a Favicon do for Your Website?
Adding a favicon may seem like a very small thing and the image itself is small. However, the impact it has is very large. Many websites, such as Facebook, Twitter, Google and many others use this little icon for branding. Here’s what they look like:

Past branding, one of the major reasons to use a favicon is for users opening multiple tabs. As they open a number of tabs, the title of your website will disappear. However, the favicon can still allow these users to recognize your website easily.
Creating Your Custom Favicon
Your favicon needs to be a simple square image that measures either 16×16 pixels or 32×32 pixels. You can create this image in Photoshop or any other image editor. Starting with a 128×128 pixel image makes it easy to resize and save at a PNG file.
Adding Your Favicon to WordPress
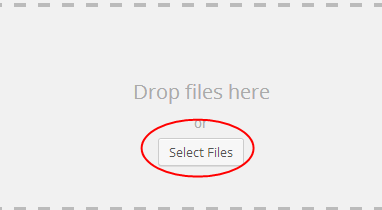
You will need to upload your favicon image to your media library before you do anything else. Go to Media >> Add New. From here, click the “Select Files” button and find the favicon you created on your computer.
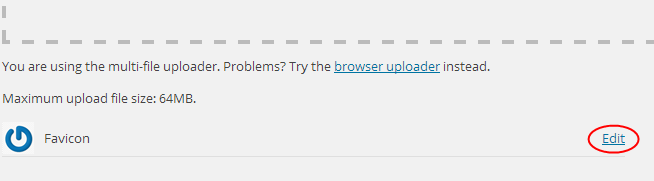
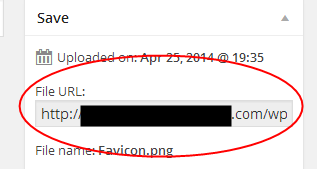
After you’ve uploaded the image, you will be able to click a link below to edit the image. This will give you the URL of the image, which you will need to copy and save for the next step.
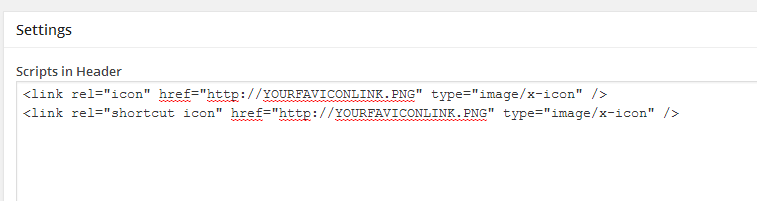
Now, you will need to download, install and activate the plugin Insert Headers and Footers.
Once the plugin is activated, you can go to Settings >> Insert Headers and Footers and use the following code to add your favicon.
Make sure the favicon displays properly for your website and you’re all set.
