
Have you ever wondered how to go about limiting the access to your WordPress login page? Limiting access by IP address provides a very strong level of security. Here’s a look at how you can limit access to your login page and keep the hackers out.
Coding The Changes
You don’t have to be an expert in coding to handle the tiny bit of coding you will need to limit login access by IP address in WordPress. This is done by first accessing the .htaccess configuration file, which you should first back up before making any changes.
Once you have backed up your site, you can get started on limiting access. You have two basic options, which includes limiting access to one or multiple static IP addresses or limiting access to multiple dynamic IP address. If you have an IP address that changes often because of travel or another reason, you will want to limit access to multiple dynamic IP addresses.
How to Access the .htaccess File
You can use FTP or cPanel to access the .htaccess file. Just log in to your cPanel and go to the file manager to access the file.
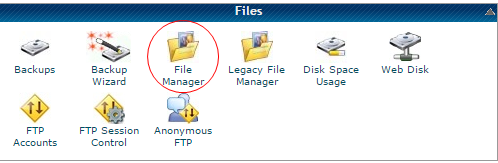
It will be found in the root of your website.

Once you find this file, you can simply edit the code to add the specific change you want.
For Single Site Users with Static IP Addresses
If you don’t want to allow access to any other user, this is the option for you. This option will also work for those with just a few people managing the website. As long as your IP address doesn’t change very often, you can use the following code to restrict the login page:

Just make sure you edit the IP Address One$, IP Address Two$ and IP Address Three$ to include the right IP Addresses. If you don’t know your IP address, just search IP address in Google and it will show up.
If you only need to add one IP address, you can delete the line for the TWO and THREE code. You can also add a line if you need more IP addresses simply by copying and pasting.
Make sure to test your site after editing to ensure you have access. If you don’t have access, check to make sure you didn’t put a space between the “^” and your IP address. You will also need to replace the path-to-your-site with your website URL for the 404 error page.
For Dynamic IP Addresses and Multiple Users
Restricting access for Dynamic IP addresses and Multiple Users is done in the same with, but with a different code. The code for this is:

Just replace the your-site.com with the UR for your actual site and make sure to replace the path-to-your-site with your URL, as well. This code also has an extra 404 error page code to ensure you don’t get thrown into a redirect loop.
If you’re worried about hackers, using this code to limit access by IP address adds another level of security. Since hackers try to access your admin area externally through bots, this is a great way to keep them out.
