As a beginner, you may feel like you’re trying to learn a foreign language by using WordPress. There are so many sections to learn how to use and so many questions you will need answers for. In this post, we will cover all the basic features of the post edit screen.
Note: If you’re using plugins for your WordPress site, you may have more options than just the basic post editor options covered in this WordPress tutorial.
What is the Post Editor Screen and Where do you Find it?
After you’ve logged into your WordPress dashboard, you can find the post editor screen in the “Posts” section of the left sidebar. The editor is found at Posts >> Add New. Click this link and you will be taken to the post editor section of WordPress.

Bloggers use this screen just about every day because it’s the section you will use to add a new blog post.
Breaking Down the Sections of the Post Editor Screen
Once you’ve arrived at the post editor screen, you will see a very large white section in the middle of the screen. This is the section you will use to add content. It has two tabs: the Visual and the Text editors.

The visual editor will allow you to see the images, text and other items you add in a similar way to how they will show up on your website. The text editor will show the code associated with these items. If you don’t have any coding experience, the visual editor is your best friend.
Title Editor
Above the main editor section, you will see a smaller white section, which is the area to add a blog post title.

Once you add a title, you will get an editor below this section to change the name of your URL for the post. If you haven’t set your permalinks yet, this may show up with a number instead of the words from your title.
You can set your permalinks in the Settings >> Permalinks section of your WordPress Dashboard. Choose the post name option and you will be able to edit this URL.

Publish Post Section
The Publish section of the blog editor screen will allow you to save your post as a draft, preview your post, publish your post, schedule the post and change the visibility.

You can make your post public, private, password protected or a sticky post from here. You can also change the status from draft to pending review. Along with both of these options, you can choose a future date and time to publish the post. All of these options are available by clicking the three “edit” links found here.
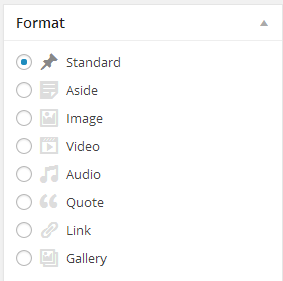
Format Section
The Format section is pretty self-explanatory. Just select the option that fits best with the type of post you’re creating. Most posts will call for the “Standard” option.

Categories and Tags Sections
The next two sections are the Categories and Tags sections. If you’ve created categories already, you can select the one you want the post to show up under. If not, you can create a category from this section.
The tags section is where you can add a few keywords to describe your post. You can also use the “Choose from the most used tags” link if you’ve used tags on your blog before.

Featured Image Section
The Featured Image Section allows you to choose an image to use for a slider, with some themes, and as the main image for your post. It’s not necessary in all cases, but can be helpful with certain themes and types of posts.

Screen Options and Help
Along with these basic sections found in the WordPress Post Editor screen, you can use the “Screen Options” to add other sections to the page. There’s also a “Help” section found next to the “Screen Options” tab.

Now you have a basic understanding of how the Post Editor section works in WordPress. If you plan to add content to website in the form of blog posts, you will want to become very familiar with this section of your WordPress dashboard.


